

Dead by Daylight’s Chapter 27: Tools of Torment has been released with one new Killer, two new Survivors, and a new map (which is slightly more content than what we usually get on each DLC). These characters have been highly controversial due to their mechanics and abilities (especially the Killer). But in this guide, you will easily learn about the three new characters added to the game in the Tools of Torment Chapter DLC and a few tips on how to use them, and how to counter the Killer. These characters can be unlocked for 9000 Iridescent Shards each, so you don’t necessarily need to buy them using real money. In any case, you can still purchase them for 500 Auric Cells each or by purchasing the Tools of Torment Chapter DLC in your corresponding digital store.
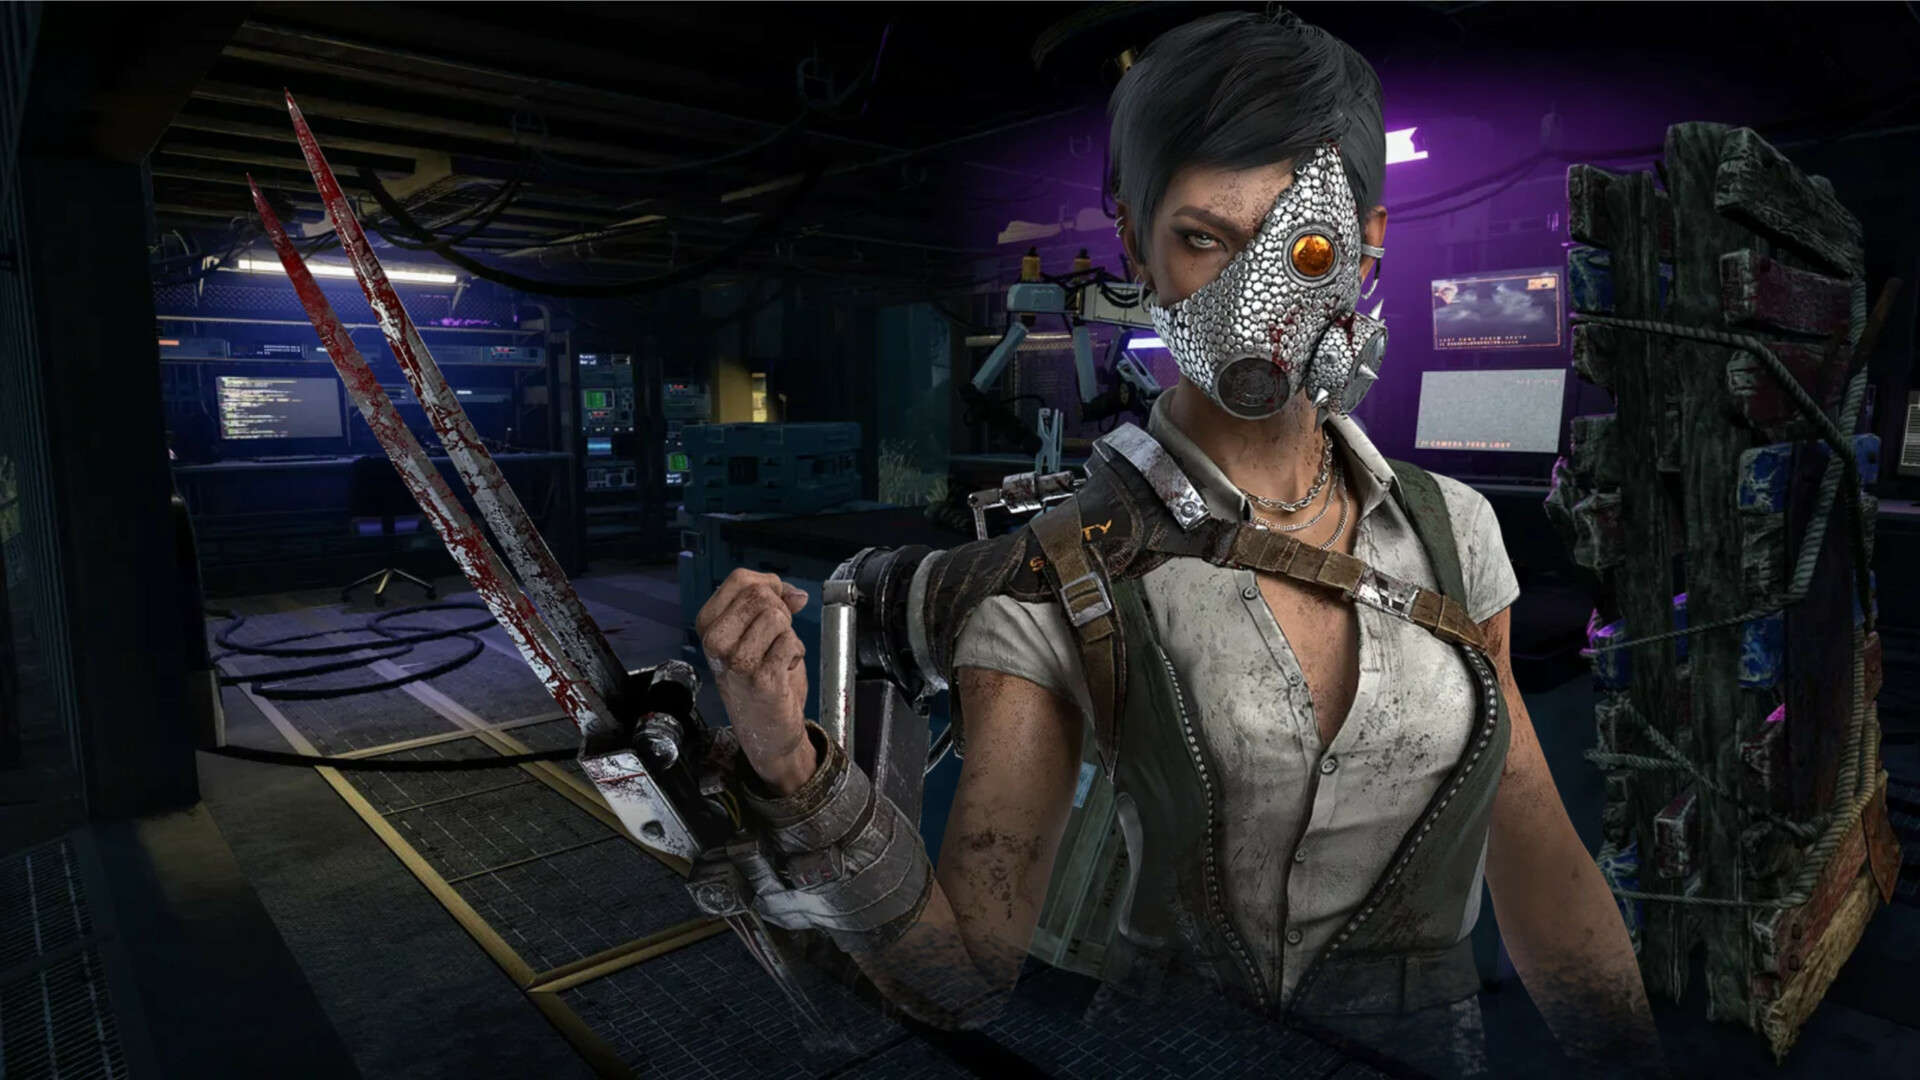
Adriana Imai “The Skull Merchant” – Tools of Torment New Killer Guide
The Skull Merchant is the new Killer of Dead by Daylight. She is a high-tech Killer that uses her Drones to spot Survivors. Her power might be a little bit underwhelming if you’re used to the game, but any Killer can be mastered and overpowered with enough practice, dedication, and a good load-out. Read this guide I wrote about the best current perks in the game in case you want to build a strong load-out.
The Skull Merchant is a tactical Killer, able to place Drones that detect and debilitate her targets.
Power: Eyes in the Sky
The Skull Merchant starts the trial with four Drones. Press the Power Button to deploy a Drone.
While active, the Drone creates a Detection Zone around itself. Within this zone, the Killer is Undetectable, and Survivors gain Lock On progress. When no Survivor is detected for a while, the Drone begins a sweeping scan. If this scan finds a Survivors, the Drone becomes active.
Survivors can hack Drones to disable them. Failure activates the Drone and immediately fills their Lock On meter; Success returns the Drone to the Killer, but sticks the Survivor with a Claw Trap. A Claw Trap broadcasts the Survivor’s location to the Killer until its battery dies. Survivors with a Claw Trap activate nearby drones and the Drone recharges the trap’s battery. Claw Trapped Survivors may remove their trap when its battery is empty.
Special Ability: Radar
Press the Ability Button to open a Radar to see the locations of Survivors with Claw Traps and those near any Active Drone. While using the Radar, target a Drone to manually activate it or recall it.

The Skull Merchant’s Radar spotting a Survivor.
Special Effect: Lock On
The Lock On meter fills up when inside a Drone’s Detection Zone. It is immediately filled when failing to disable a Drone. When full, the Survivor is revealed by the Killer Instinct while near active Drones and suffers from the Exposed status effect until the meter depletes while outside Detection Zones or they are put into the dying state.
Eyes in the Sky: Tips & Strategies
The first thing you have to be aware of when you’re using The Skull Merchant is where you’re going to position her Drones. Remember you only have 4 of them. The best spots where you can place them are near generators (especially those you think Survivors may be trying to repair sooner than later), and near pallets in areas where you’re chasing a Survivor.
Drones near generators will force Survivors to either stop repairing the generator or hack the drone. Both scenarios are convenient for you, since they will be spotted on your radar if they stay in the area (regardless if they manage to deactivate the drone or not). Drones near pallets are also good to force Survivors to abandon the area, this will help you avoid getting looped since Survivors will not want to fill their Lock On meter, which is definitely the worst-case scenario for them.
Also, make sure to regularly check your Radar in case Survivors have been spotted or Claw Trapped by your Drones. Don’t just continuously check the radar at all moments though, since you will lose a lot of precious time doing so. Only check it if you’re not chasing a Survivor and have been patrolling the generators correctly.
By the way, you should recall your Drones and reposition them if Survivors haven’t been wandering around the area where the aforementioned Drone is. The more areas you can block with your Drones to prevent Survivors looping you or repairing generators, the better.

Use your drones to spot Survivors easily and catch them as fast as possible.
Perks
- Thwack!: After hooking a Survivor, this perk activates. The next breakable wall or pallet you break will make Survivors within 32 meters scream and reveal their aura for 4 seconds.
- Leverage: Each time you hook a Survivor, gain 1 token, up to 10. When you hook a Survivor, this perk activates for 30 seconds. For each token, reduces the speed at which Survivors heal by 5%.
-
Game Afoot: While you’re chasing the Obsession, this perk activates. Damaging generators and breaking walls or pallets give you a 5% Haste Status for 10 seconds. Whenever you hit the Survivor with the total most time in chase with a basic attack, they become the obsession.
The Skull Merchant’s Perks: Tips & Strategies
The Skull Merchant’s perks can be used with other Killers if you reach prestige 3 with this particular character.
Thwack! is one of the most interesting perks on the list. Despite it being just an information perk, it brings a whole new meaning to breaking walls and pallets. You shouldn’t go out of your way to do this if you have more important stuff to do, but this will help you to locate survivors easily if you have a pallet or wall near a place where you think a Survivor could be, so always remember to break one after hooking a Survivor if you’re in need of an easy hook.
Leverage would probably be the best choice for veteran players since it allows you to slow down the match by reducing the Survivors’ healing speed. It is a passive perk, so you won’t have a clue if it is being helpful to you or not. Since its effects are time-limited, it is recommended to try combining it with other perks that slow down the Survivors’ progress in order to increase the perk’s effects (like Dying Light, for example).
Game Afoot is pretty similar to other perks that give you slight speed boosts. I personally don’t recommend this type of perk, but it can be particularly broken on Killers with insane speed like The Shape on Tier III, for example. So that’s a good way to take advantage of haste perks.

“Thwack!” will make pallets and walls not-so-annoying anymore.
How to Counter The Skull Merchant
The best way to avoid getting crushed by The Skull Merchant is by not playing her Drone games. You see, this is a Killer that can easily succeed if you’re playing with the conditions she keeps establishing during the whole match. A Drone will force you to either expose yourself by ignoring it or also expose yourself by hacking it and getting Claw Trapped in the process (if you successfully manage to deactivate it).
If you see a Drone patrolling a generator, try to move to another one. Avoid losing time trying to hack the Drone unless the Killer is being distracted or is extremely necessary to increase the match’s objective progress.
If you’re confident enough and believe you can do it, you can purposefully expose yourself to Drones and distract the Killer. This will allow you to help your teammates to rescue hooked Survivors and complete objectives. The Killer will probably do everything to catch you before anyone else if you’re under the Exposed Status Effect, but you’ll be vulnerable to being down in one hit. As always, bring one Exhaustion-based perk to the match (I personally recommend Balanced Landing, it’s the most versatile one).
Thalita Lyra – Tools of Torment New Survivor Guide
Thalita Lyra has mastered the art of competitive flair, fighting kites with skill and flourish. She is the first of the two Survivors added in this chapter and her perks promote working as a team to survive.

Thalita is a recommended character for those who want to actively support the team.
Perks
- Friendly Competition: Whenever you finish repairing a generator with at least one other Survivor, this perk activates. You and other Survivors who finished repairing the generator with you get 5% increased repair progress speed for 75 seconds. This perk cannot be stacked.
- [Teamwork] Power of Two: Whenever you finish healing another Survivor, you both move 5% faster as long as you stay within 12 meters of the Survivor you healed or until one of you loses a health state.
- Cut Loose: After performing a rushed vault in a chase, this perk activates. While this perk is active, your rushed vaults are silent for up to 6 seconds and successfully performing a rushed vault during that time resets the timer.
Tips & Strategies
Thalita Lyra’s perks can be used with other Survivors if you reach prestige 3 with this particular character.
Cut Loose is a good perk to confuse the Killer in the middle of a chase since it completely silences your rushed vaults for a short period of time, which is very good when you want to play mind games against the Killer. You have to make sure you’re mind-gaming the Killer correctly though, this perk will be practically useless if you try to use it while the Killer is directly looking at you (they will have a good idea of where you are, regardless if you’re making noise or not). Make sure you’re not in the Killer’s line of sight if you want to use this perk correctly after vaulting a few windows.
Friendly Competition and Power of Two are perks that allow you to support the team. You need to actively seek to do the perk requirements to get the bonus movement and repair speed. It’s hard to notice the effects of this perks, because you need to wait for certain conditions to activate them. But the good thing about these perks is that they promote teamwork, so if you’re the lone wolf type and want to start working more with your team, these perks may not be a bad choice to start getting used to that.
Renato Lyra – Tools of Torment New Survivor Guide
Renato Lyra always keeps his eyes on the prize, and he expects the same from his teammates. He is the second Survivor added in the Tools of Torment Chapter DLC and the last character we’re going to cover in this guide. Renato is a jack of all trades. His perks allow him to escape more chases, perform rescues, and complete objectives more easily.

He is arguably more powerful than Thalita and is very recommended for veteran players.
Perks
- Blood Rush: This perk activates once you are one hook away from instant death. While healthy, running, and suffering from Exhaustion, press the Active Ability Button 1 to lose a health state and recover from Exhaustion instantly and gain the Broken status effect for 20 seconds. You are automatically healed from injured to healthy after 20 seconds. Being put into the dying state will cancel the healing effect.
- [Teamwork] Collective Stealth: Whenever another Survivor finishes healing you, you both leave no scratch marks as long as you stay within 12 meters of the Survivor who healed you or until one of you loses a health state. This perk can only trigger once every 140 seconds. This perk cannot be stacked.
- Background Player: When the Killer picks-up another Survivor, this perk activates for 10 seconds. When you start running, break into a sprint at 150% of your normal Running Movement speed for 4 seconds and gain Exhaustion. This perk cannot be used while Exhausted and causes Exhaustion for 40 seconds.
Tips & Strategies
Renato Lyra’s perks can be used with other Survivors if you reach prestige 3 with this particular character.
Blood Rush is a game-changer. It is a hard-to-master perk, but it can be very overpowered if used correctly. It is the first perk of the game that allows you to actively make the Exhausted Status disappear, hence why this perk can only be activated once per game. You should combine this one with any Exhaustion-based perk that doesn’t require you to be injured to use it (for example Sprint Burst, Balanced Landing, or even Background Player now that we’re at it). To make it simple: you must use this perk whenever you want to use your Exhaustion-based perk again and escape a chase more easily. Take note that you have to avoid taking damage for 20 seconds once you use it.
Collective Stealth is another Teamwork-based perk. It is good to avoid getting tracked by the Killer after another Survivor heals you, so you can easily go finish an objective or rescue another Survivor without leaving scratch marks (as long as you stay with the Survivor that healed you).
Background Player is a very simple Exhaustion-based perk, but a good one if you use it correctly. It allows you to run very fast after the Killer carries a Survivor. Unlike other Exhaustion-based perks, this one doesn’t help you to escape chases. This perk is only helpful to reach objectives and rescue Survivors much faster, (since you have to wait for the Killer to carry a downed Survivor for the perk to activate). So, whenever the Killer carries a Survivor, make sure to run and rescue that hooked Survivor or finish that 95% generator, you will have enough speed for 4 sweet seconds to do so.
Where to Buy the Tools of Torment Chapter DLC
That was my Tools of Torment Chapter DLC guide. Dead by Daylight’s Tools of Torment Chapter DLC is now available for PC on Steam and Epic Games Store, PS4 & PS5, Xbox One & Xbox Series X|S, and Nintendo Switch. The current Rift will close in less than 30 days, so make sure to complete all remaining challenges and claim those sweet cosmetic rewards. See you all in the fog!


