
The last bit of DLC for Xenoblade Chronicles 3 has finally launched and Future Redeemed is an incredible finale to the Klaus trilogy. With plenty of call backs, reveals and new memories to share, the expansion is a fantastic treat for any Xenoblade fan. One of the best little things in Future Redeemed is the Affinity Scenes, small moments between your main cast that acts like a streamlined version of Heart to Hearts. These shed new light on the world, have characters reminisce on the past or are just simply amusing moments.
There are a lot of these Affinity Scenes scattered around the world, sometimes hidden away in areas without easy access. For each Scene you find, you earn a good chunk of Affinity Points for your characters, so there’s a tangible incentive for finding them all outside of the narrative.
Here’s where to find all 20 Affinity Scenes in Xenoblade Chronicles 3: Future Redeemed.
Want more Xenoblade Chronicles 3 and Future Redeemed content? You can find more here on KeenGamer:
- Xenoblade Chronicles 3 | How to Unlock Shulk and Rex as Heroes
- The Importance of Accents in Xenoblade Chronicles
- The Brilliance of Accents in Xenoblade Chronicles 3
- Xenoblade Chronicles 3: How To Unlock All Heroes
- Xenoblade Chronicles 3: How To Unlock All Hero Ascension Quests

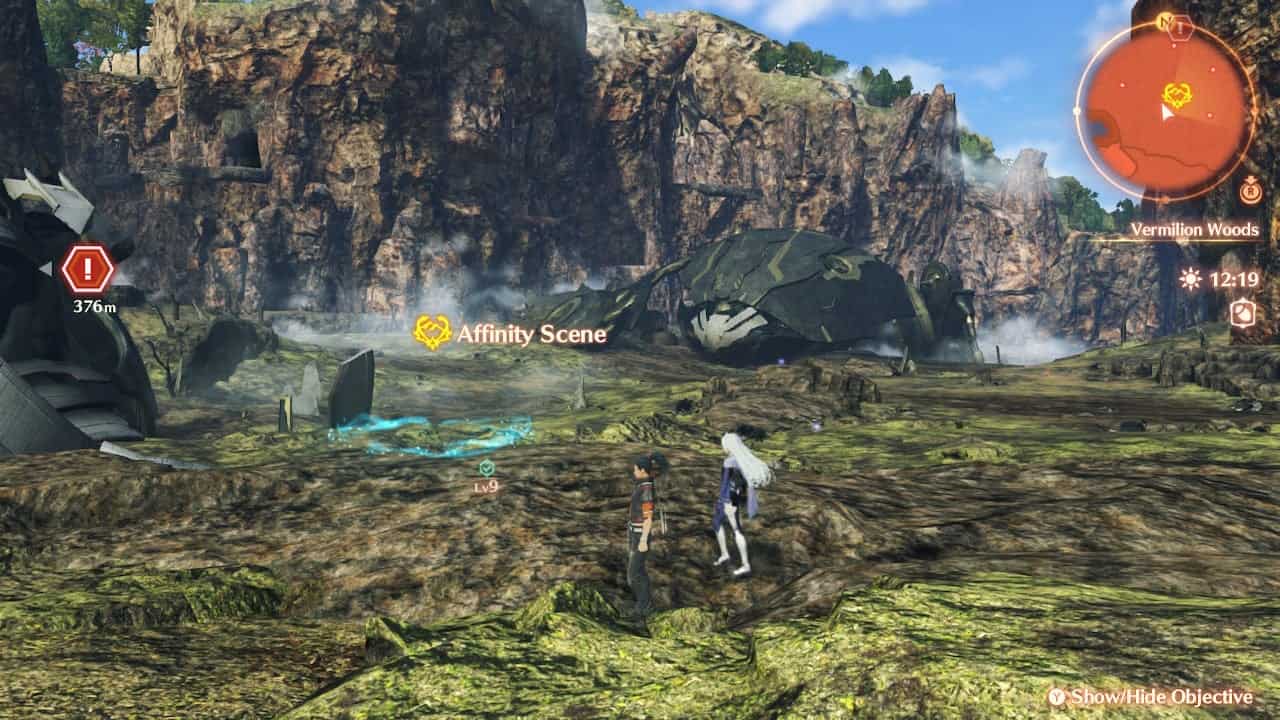
Vermillion Woods Affinity Scenes
Scene 1
The first Affinity Scene is very hard to miss: in fact, it’s the tutorial Affinity Scene and the one which explains the concept to you.
Right after starting the DLC and getting done with your fight battle as Matthew and A, you’ll enter the Leaf-Strewn Clearing area of the Vermillion Woods. Directly on the main path will be the first Affinity Scene, glowing nice and blue against the orange autumn leaves.
-

- Vermillion Woods 1

-
- Vermillion Woods 1 Map Location

Scene 2
The second Affinity Scene in the Vermillion Woods requires a bit more story progress. You’ll be going until after you first meet Nikol and Glimmer, and after the latter has escaped.
At this point, you’ll be free to roam the area where Colony Gamma and Colony 5 had their massive conflict, with the ruins of their Ferronises littering the battlefield. Near the Colony Gamma Ferronis on the left side of the large battlefield will be the next Affinity Scene.
-
- Vermillion Woods 2
-
- Vermillion Woods 2 Map Location

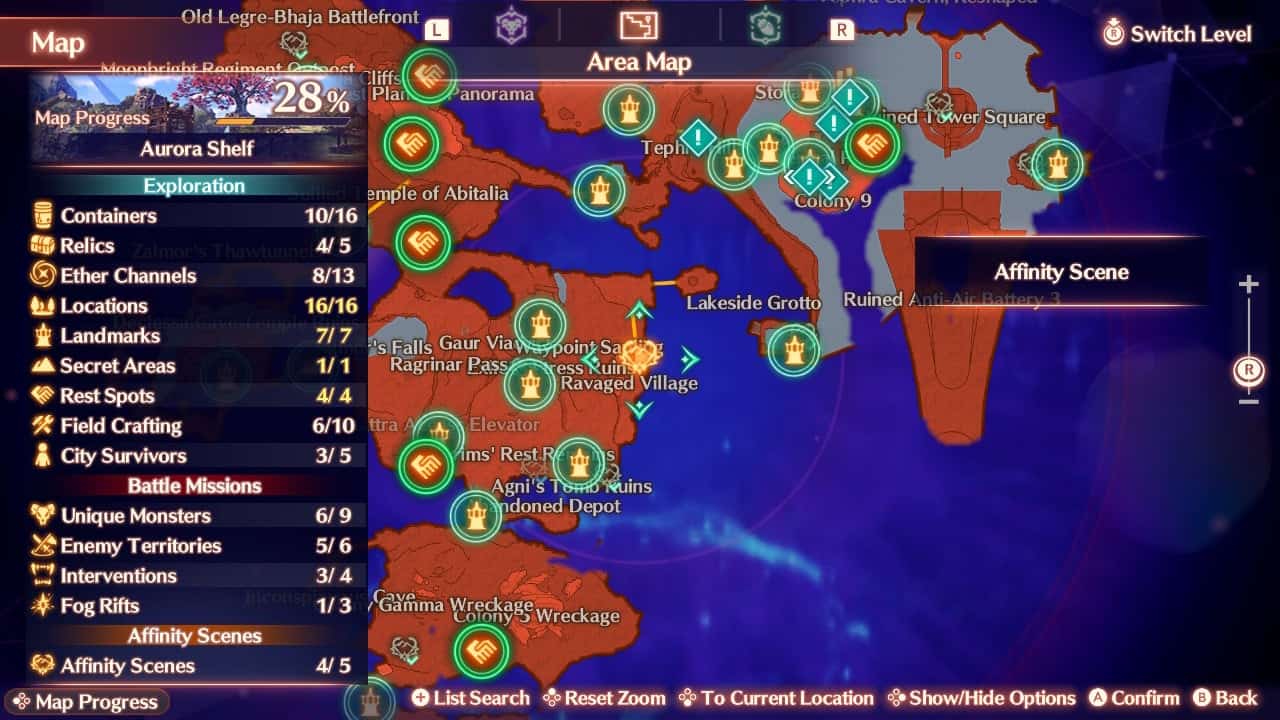
Aurora Shelf Affinity Scenes
Scene 3
The next few Affinity Scenes can be found in Future Redeemed’s second major area, the Aurora Shelf. The first one can be found as soon as you enter the region from the Vermillion Woods.
After exiting the elevator you fixed during the story, look left and you should see a massive Saffronia Tree atop a cliff nearby. You’ll need to climb up this cliff to reach the giant tree, where the Affinity Scene will be waiting nestled amongst its roots. This area is also a Landmark called Pioneer’s Point, making it easy to be fast-travelled to.
-
- Aurora Shelf 1

-
- Aurora Shelf

Scene 4
The second Aurora Shelf Affinity Scene is closeby to the first. If you start at Pioneer’s Point from the previous Scene, head back down the slope and then go left towards the boundary of the map.
Keep going towards the edge of the map, past an Intervention, and you’ll reach the Three-Pillar Transept Ruins. The next Affinity Scene is available by standing steadily on the edge of this cliff, looking out on the Mechonis Sword in the distance.
-
- Aurora Shelf 2

-
- Aurora Shelf 2 Map Location

Scene 5
To reach the next Affinity Scene, we’ll be going somewhere familiar and somewhere underground. There are a few of these underground sections in Xenoblade Chronicles 3: Future Redeemed and this next Scene just happens to be in one.
Starting at the Elevator Landing Camp, you can head left to find a hidden cave underneath where the camp is located. Heading deep into this rocky tunnel and past a bunch of Crustips until you reach a grand room at the end. Any fans of Xenoblade Chronicles 1 will recognise this room from the Satorl Marsh, as well as the massive sarcophagus at the end. The Affinity Scene is waiting for you at the entrance to this room.
-
- Aurora Shelf 3

-
- Aurora Shelf 3 Map Location

Scene 6
The fourth Affinity Scene in the Aurora Shelf is likely one of the harder ones to find. It’s located on a raised section of the map which is hard to get to: you even have to travel to a different area to reach it. You’ll also need crafting materials for several Ether Lifts and Ether Slides, so come prepared with plenty of Wool Rock.
Starting at Yesterdale’s Outlook Park, look over the side by the stairs and you’ll see a cave at the bottom. You’ll need to jump down into this section, which leads into a larger cave with a Unique Monster inside. Behind said monster is the first Ether Lift you need to build and it will take you high into a new location of the Aurora Shelf.
Then you need to build another device, an Ether Slide to be precise. This needs more resources and, after crossing it, you’ll be mortified to learn that you need to build a third Etherdevice to finally reach the Affinity Scene. Cross this final Ether Slide and you’ll arrive at the Ravaged Village from Matthew and Na’el’s past: the Affinity Scene can be found lonely waiting within.
-
- Aurora Shelf 4
-
- Aurora Shelf 4 Map Location
Scene 7
Finally, for the Aurora Shelf at least, is the Affinity Scene at Diablada Cliffs… well below Diablada Cliffs. You’ve likely seen this Affinity Scene before and just couldn’t figure out how to reach it: if you jump down, you’ll just die from the fall damage.
What you need to do to reach this area is build an Ether Lift to take you there safely. Said Lift can be found on a rocky ledge near the Panorama Camp. This will take you to the vast world below but, be warned, it’s full of tough, high-level enemies.
Your goal is the ruins of the fused-Ferronises that were piloted by the Moebius you kill in the main story. The Affinity Scene is on the edge of the massive crater caused by the machines falling to the ground.
-
- Aurora Shelf 5

-
- Aurora Shelf 5 Map Location

Yesterdale Affinity Scenes
Scene 8
Yesterdale is a reborn Colony 9 from the original Xenoblade Chronicles and there are a lot of really nice, nostalgic Affinity Scenes to take in. The first (and second) Scenes, in particular, are in a very familiar location.
After entering the Liberator’s base for the first time and walking across that oh-so-familiar bridge, you’ll notice an even more familiar house on the outskirts of Colony 9. This is Dunban’s house. Enter this house and walk up its decrepit, broken stairs to find the next Affinity Scene, outlooking the window where Shulk’s mentor watched him and Reyn depart from the Colony so long ago.
-
- Yesterdale 1

-
- Yesterdale 1 Map Location

Scene 9
Just like the first Yesterdale Affinity Scene, this next one also takes place at Dunban’s House. Since it is relatively abandoned now in Aionios, Riku has taken up shop in the space below and the next Affinity Scene is waiting right in front of them.
However, this Scene is one of the few which require story progress to complete. You need to reach the Black Mountains, the final area of the game, before you can view this Affinity Scene so keep in mind if you’re still early on in the DLC.
-
- Yesterdale 2

-
- Yesterdale 2 Map Location

Scene 10
The third Yersterdale Affinity Scene can also be found within the walls of Colony 9. It’s a bit deeper than Dunban’s house but it’s still in a very familiar location.
Past the Colony 9 Camp is a set of bridges leading to the Ruined Tower Square, an area now being occupied by broken City transport ships. The Affinity Scene can be found amongst this wreckage.
-
- Yesterdale 3

-
- Yesterdale 3 Map Location

Scene 11
For the fourth Yesterdale Affinity Scene, you’ll be taking a trip down memory lane. You need to head for Outlook Park, one of the most memorable locations from the starting hours of Xenoblade Chronicles.
The path from the Colony 9, Main Entrance Landmark is also exactly the same as you likely remember it. Take the path leading south from the entrance and ascend the stairs to reach the secluded park, still so comforting after all these years. The Affinity Scene is overlooking the Colony.
-
- Yesterdale 4

-
- Yesterdale 4 Map Location

Scene 12
The final Affinity Scene in this location requires some swimming to reach. From the Ruined Tower Square jump into the water below and swim over to the edge of the map. There’s a strange outcropping of land with some ruins on it.
Reach this island and the Affinity Scene will be close by. This is another Scene which asks you to reach the Black Mountain before you watch it.
-
- Yesterdale 5

-
- Yesterdale 5 Map Location

The Ragmos Desolation Affinity Scenes
Scene 13
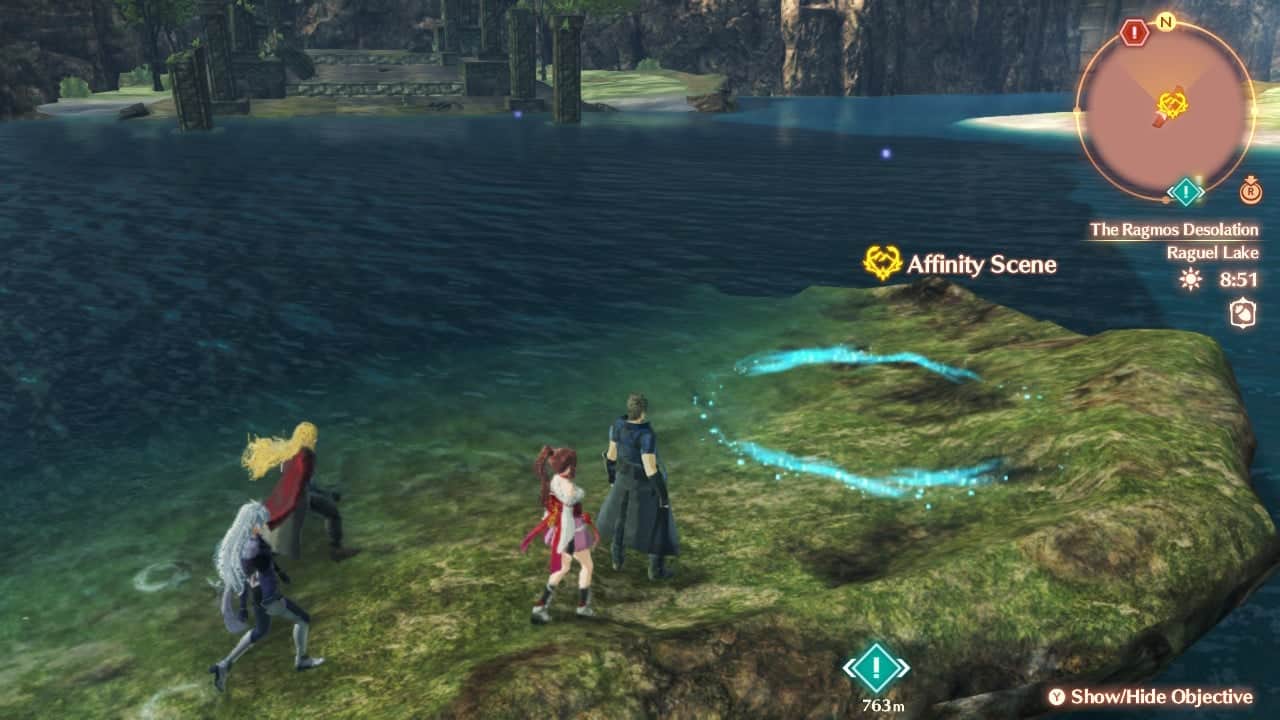
The Ragmos Desolation is a pretty big area of the map and one that encompasses a lot of different areas from the previous 2 Xenoblade games. The first Ragmos Desolation Affinity Scene can be found on the main chunk of land in the area, the one you traverse on your first journey to Raguel Lake.
Along your path to the Lake and before a massive camp of Agnian soldiers are the Lumos Pillar Remnants. These ruins are holding the Affinity Scene within.
-
- The Ragmos Desolation 1

-
- The Ragmos Desolation 1 Map Location

Scene 14
The next Affinity Scene is located within Raguel Lake itself. You can simply travel to the Lakeside Camp and then jog on over to the edge of the Lake for easy access.
This Scene is located on a small chunk of land in the middle of the western part of the Lake. It’s looking out onto the Waterlogged Daksha Shrine and contains some fun reminiscing about what once occurred there.
-
- The Ragmos Desolation 2
-
- The Ragmos Desolation 2 Map Location

Scene 15
Another Affinity Scene can be found at the Lake but it is much higher up on top of one of the strange mushroom-like growths dotted around the place. The easiest way to reach this location is to make it to the Raguel Birgde Camp: from here, look below the bridge and you should be able to safely jump to the mushrooms below.
Careful waddle across these platforms and their suspended bridges until you reach the Affinity Scene.
-
- The Ragmos Desolation 3

-
- The Ragmos Desolation 3 Map Location

Scene 16
For the last Ragmos Desolation Affinity Scene, progress through the story until you unlock access to the higher level of the area. You will ride an Ether Lift up through the Reformed Tephra Cave and into an old Tantal Ruin. This Ruin is actually where the next Scene is.
Once you reach the Oracle Spire Landmark, go straight forward on the path right in front of you, ignoring the nearby Kevesi patrolling the area. This path takes you to a ladder that needs reconstructing, and the Affinity Scene is at the very top.
-
- The Ragmos Desolation 4

-
- The Ragmos Desolation 4 Map Location

Black Mountains Affinity Scenes
Scene 17
The final four Affinity Scenes in Xenoblade Chronicles 3: Future Redeemed are located in the Black Mountains, the last area in the DLC. This harsh, snowy environment is holding many secrets, but the first Affinity Scene isn’t one of them.
After reaching the Black Mountains from the Ragmos Desolation, wander around the border of the platform you find yourself on. The Affinity Scene is resting on the edge, looking out toward the Agnian Castle.
-
- Black Mountains 1

-
- Black Mountains 1 Map Location

Scene 18
The next Scene can be found a bit deeper into the Mountains. Once you’ve fixed an elevator and ridden it to the top, you’ll enter a small cluster of ruins that requires you to climb a ladder to escape.
Instead of going in the intended direction for progress, go left after heading up the ladder. There are some vines on the wall that you can climb which will allow you to reach the Affinity Scene.
-
- Black Mountains 2

-
- Black Mountains 2 Map Location

Scene 19
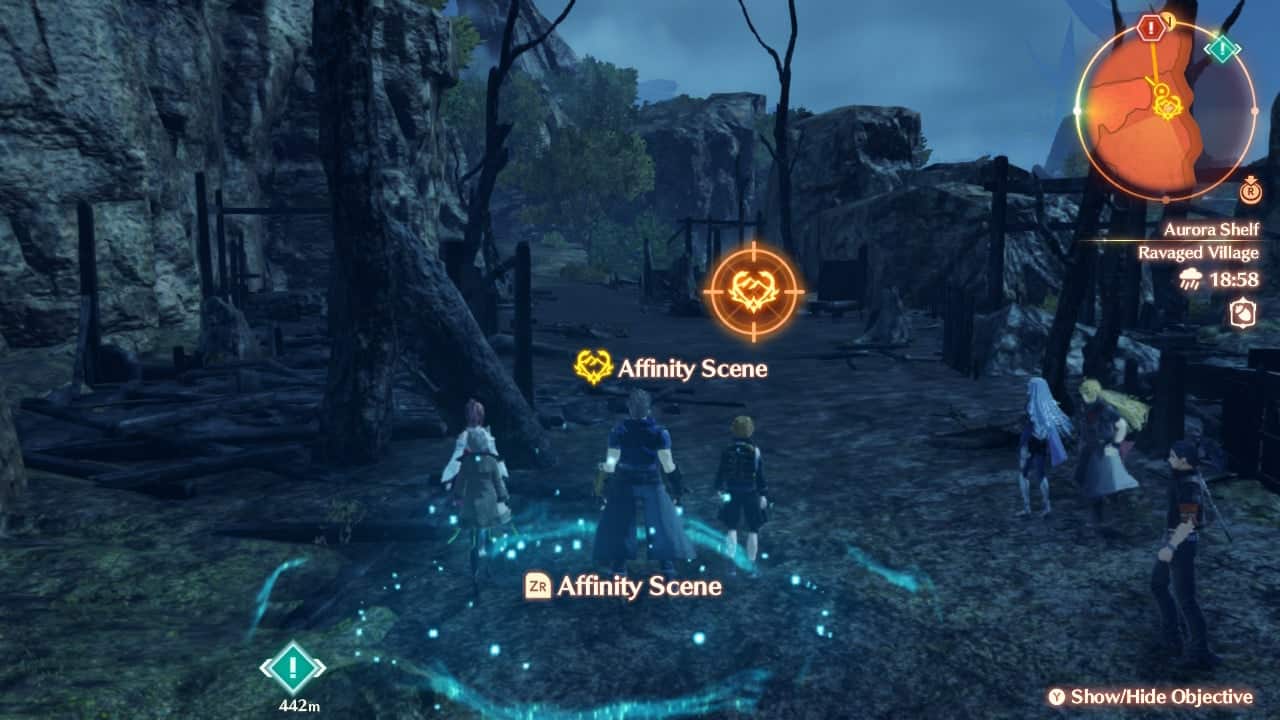
The last two Affinity Scenes are hard to miss given that they’re on the golden path towards the end of the game.
Once you’ve gotten through a large amount of the Black Mountains, you’ll reach Prison Island. Upon entering the Corridor of Silence, you can interact with the nineteenth Affinity Scene at its heart, letting you hear what some of the newer party members think of the Prison’s eerie aesthetics.
-
- Black Mountains 3

-
- Black Mountains 3 Map Location

Scene 20
Finally, the last Affinity Scene asks you to reach the summit of Prison Island.
You’ll find it after reaching the Prison Island Camp. It is right next to the stairs that lead to the final battle in the expansion, allowing you a last brief moment of respite before the end.
-
- Black Mountains 4

-
- Black Mountains 4 Map Location

Congratulations! You’ve found all of the Affinity Scenes in Xenoblade Chronicles 3: Future Redeemed. For unlocking all of them, you’ll receive a ton of Affinity Points for upgrading your character’s Arts, Skill and more.


