
Stardew Valley, released on Steam in 2016, is already an incredible game with hours and hours of content, but what if you want more? Learning how to mod the game may sound intimidating if you’ve never done it before, but it’s actually really straightforward when following the right steps. Here, you’ll find those steps and a few tips to enhance your modded Stardew Valley experience. Depending on your chosen method, you can play modded Stardew with or without a mod manager.
Abigail portraits pictured, top to bottom: Character Portrait Overhauls by Kamirose, Baechu’s Portraits by Baechu and Variant Anime Portraits by Bunnerz.

Backing Up Your Saves
Before anything else, back up any current saves. You don’t necessarily have to, but it’s always better to be safe in case something goes wrong. This can be done in Steam by selecting Stardew Valley, then the cog icon and Properties. Once the new window has popped up, select Local Files from the menu on the left, then click “Backup game files”.

Backing up game files is important.
You’ll see a list of your games and Stardew Valley should be selected automatically. You can then use Steam’s default backup location or select your own. Now, you just have to decide whether or not to use a mod manager.
How to Mod Stardew Valley on Steam: The Basics
You’ll only need a few things for modding Stardew Valley: a copy of the game, SMAPi (which I’ll cover in a moment) and, optionally, a backup of your current saves. You’ve already learned how to back up your saves through Steam, so let’s jump into installing SMAPI.
Downloading & Installing SMAPI

SMAPI’s website displays the program’s download front and center.
No matter what mod manager you’re using, if you’re using one at all, you’ll first need to download SMAPI. SMAPI is the Stardew Modding API and is required for pretty much every mod. To download SMAPI, simply head to their website and click the green download button.
Once SMAPI has been downloaded, head to the location you saved it to. For most people, this will be the downloads folder. Once there, right click the SMAPI-<version number>-installer zip file. Then either select “Extract All…” or use your preferred application to unzip the file.

Make sure to select the correct install file!
After you’ve unzipped the file, go into your newly created folder. Once inside, select the file that matches your operating system. For example: if you’re using Windows select the install on Windows bat file.
Now, depending on which file you clicked, these steps will look a little different. But, as far as I’m aware, the steps should be functionally the same.

Make sure you copy the entirety of the address bar.
All you need to do is confirm your game’s install folder. It should be detected automatically, but if it isn’t here’s what to do. Go back to steam and select the cog icon. Select “Manage > Browse local files” and you’ll be taken to the install folder. Just copy the text shown in the address bar and paste it into the SMAPI window. Now you’re ready to go!
Once you’ve confirmed your Stardew Valley’s install location through Steam, type “1” and then hit enter. Now SMAPI will install into your game’s folder!
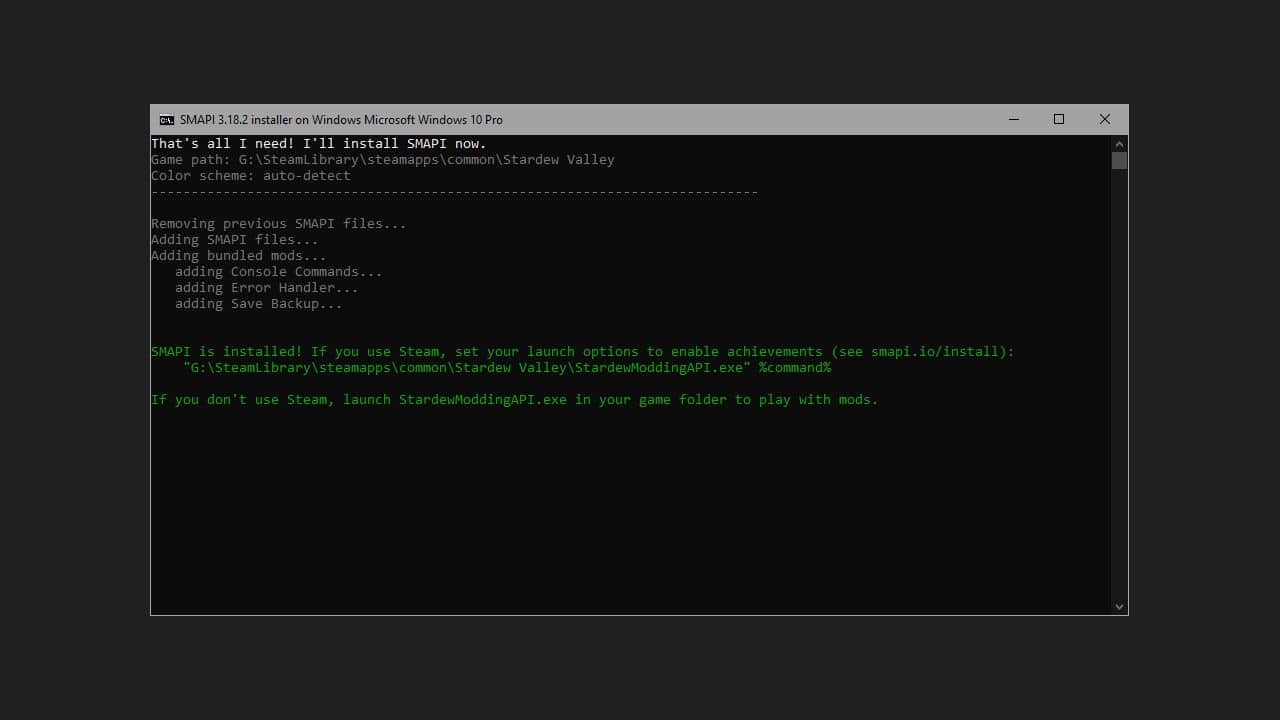
SMAPI is done installing!
The final step is to copy the green text shown in the SMAPI window into Steam. The text should have your install location followed by the SMAPI exe and %command%. To paste it into Steam, go back to the Stardew Valley game page and select the cog. After that, go to “Properties” and paste the text under “Launch Options”.
Installing Mods
Congratulations! Now you can start installing mods! If you want to use a mod manager, you can skip this section and move on to the next.
There are a ton of places to download mods from, but the main place to go is Nexus. You can install any mod you want, but for this example I’ll show how to download Content Patcher. I would recommend you download it as well, because it’s a requirement for many, many mods.

The Vortex button is only if you’re using a mod manager.
Click the “Manual” button in the top right. This will show you any dependencies you need and gives you links to their download pages. For Content Patcher, the only dependency is SMAPI, so you can click “Download”. You can save the file to wherever you’d like, but avoid putting them in the same folder as SMAPI for now. If you’re downloading a lot of mods at once, put them all in the same folder to help speed up the next step.
Now, extract the Content Patcher zip file like before. Once that’s done, go into the new folder. Next, drag the Content Patcher folder into the Mods folder. You can find the mods folder in the same way we found the Stardew Valley install path earlier. Click the cog, then go to “Manage > Browse local files”. There you’ll find the mods folder.

Your folder might have different files, since this is your first mod.
And, with that, you’ve now installed your first mod. Content Patcher won’t do anything on its own, so go check out some more mods on Nexus! I’ll also recommend a few of my favorite mods at the end, so feel free to check them out as well!
How to Mod Stardew Valley on Steam: Using a Mod Manager
This method is a bit more work than the first one, but I feel it makes things easier in the long run. A mod manager, for those unaware, will allow you to easily activate and deactivate mods without manually moving them around. Some mod managers will also download mods for you, making things way easier.
Which Mod Manager Should You Use?

Stardew Valley Mod Manager, a now defunct mod managing program.
While a lot of mod managers have been abandoned as of 2023, there are still a few options to choose from. I’ll go over the main three I’ve used, although feel free to use a different one if you’d prefer.
Stardrop
Stardrop is, in my opinion, the best mod manager for Stardew Valley. It looks great, is super lightweight and I have yet to encounter a single bug. It supports multiple profiles, has great sorting functionality and makes it easy to download/update mods.
The biggest issue with Stardrop is that you can’t browse mods in the program. You’ll have to find them online. Additionally, Stardrop will only download mods from Nexus. If you find mods anywhere else, you’ll have to import the zip file manually.

Stardrop’s UI is simple and intuitive.
Even with those issues, I would still recommend Stardrop over the other mod managers listed here. You can download Stardrop from Nexus.
ModDrop
I don’t have a ton of experience using ModDrop. I’ve only used it for a short time to familiarize myself with it for this guide. I would say ModDrop only really beats Stardrop in downloading mods. The UI feels more cluttered and it feels a bit slower. It can, however, download mods from both Nexus and the ModDrop website. You can also browse mods available on their website while using the app. It shares most other features with Stardrop.

ModDrop allows you to browse mods right in the app!
ModDrop, with how easy it is to browse mods, makes a solid competitor to Stardrop. If you’re looking for a mod manager that makes finding and downloading mods as easy as possible, ModDrop might be for you. You can download ModDrop for Windows from their website. MacOS is currently in beta and Linux is unavailable.
CurseForge
The third and final mod manager I’ll mention is CurseForge. You should probably go with one of the other mod managers, but I’ll mention some good points. CurseForge supports a ton of games, so it’s unlikely support for it will die anytime soon. You can also browse CurseForge mods from within the app.

CurseForge has a small selection of easily available mods and no way to download from external sites.
I would not recommend CurseForge for most situations. It tends to be buggy and slow, plus downloading mods is more of a hassle. However, it’s very popular for Minecraft mods. So, if you currently use it for modded Minecraft and don’t want to install another mod manager, go ahead and use this. You can download CurseForge from their website. Linux unavailable.
Setting Up Your Mod Manager
Now, I’ll show you how to set up either Stardrop or ModDrop. Since I only recommend using CurseForge if you already have it, I won’t explain how it works here.
Setting Up Stardrop
Stardrop was released at the end of 2021, but it’s already an incredible program.
First off, you’ll need to download Stardrop from Nexus. Once you’ve got it downloaded, extract the new Stardrop zip file. After that, just move the Stardrop folder to wherever you’d like to keep it. The Stardrop exe file in that folder will now launch the mod manager.
Installing Mods with Stardrop
There are two ways to install mods with Stardrop. First, you can just download the zip file as you would normally and then import it into Stardrop. Simply click “File > Add Mod” and select the mod’s zip file.

Installing mods with Stardrop is easy!
Another way to download mods with Stardrop is to link your Nexus account. To do so, go to “Nexus Mods > API Connection” and follow the instructions. Once your account is linked, you can click the “Vortex” button in the top right of a Stardew Valley mod page and it will be sent to Stardrop. All mods will install next time Stardrop is opened.
Setting Up ModDrop

ModDrop’s website will take you straight to the app’s download page.
After downloading the ModDrop exe, open it and choose where to install the program. Once it’s been installed, you’ll need to click “Run” to open the app. You’ll be presented with a login screen. You need to login with a ModDrop, Facebook, Google or Twitch account. If you don’t have an account, you’ll be prompted to create one.
Installing Mods with ModDrop
Once your account is set up, all of your games should automatically be detected. Select Stardew Valley from the menu on the left and start looking for some mods! To connect to Nexus, click the “Enable Downloads from Nexus” button and follow the instructions. Now you can install mods by clicking the “Vortex” button on Nexus pages.
Launching Your Mod Manager Through Stream

Your “Launch Options” box should look like this.
To have your mod manager open when you launch Stardew Valley through Steam, you just need to do one thing. Go to your mod manager’s install location and right click on the exe file. Click copy and return to your Stardew Valley properties page in Steam. Replace the “<Install Location>SMAPI.exe” with the text you just copied. Now, your mod manager will launch when you click play in Steam.
Some Mods to Get You Started

Animal Crossing Dig Spots changes the look of the game’s dig spots to match a certain other life sim.
Now that you’ve finished setting up SMAPI and a mod manager, here are a few mods that I’d recommend to anyone just starting out with modded Stardew Valley.
Animal Crossing Dig Spots
One of my favorite small mods is Animal Crossing Dig Spots. While I do like the base game’s dig spot texture, it’s a lot easier for me to recognize them with this mod.
Better Water 2

The “Teal” option in Better Water 2.
Better Water 2 changes the look of the game’s rivers, lakes and oceans. There are a few configuration options available, so you can customize things to your liking.
Stardew Aquarium
While fishing is certainly a very fun and rewarding pastime, Stardew Aquarium adds a bit more incentive to catching fish. Once you have access to the train station, you can travel to an aquarium and donate your fish! It’s a fun time watching them swim around their tanks.

The Curator, a new NPC from the aquarium.
And that’s it! Hopefully you’ve found this guide helpful. If you’re looking for more info on Stardew Valley, check out some of our other guides.
