

Crash Team Racing Nitro-Fueled recently wrapped up its final Grand Prix, but that doesn’t mean the game is done getting new content. In fact, after the last Grand Prix ended, there was an update that added a new type of crate to the game. These new crates are called Beenox Crates and can be recognized by the Beenox logo printed on their sides. There is one Beenox Crate hidden on each of the 39 tracks (not counting the PS4-exclusive Retro Stadium). If you can find and smash all 39 of these crates, you will unlock a new character: The Iron Checkpoint Crate. You read that correctly, you can now unlock and play as a box.
Since most of the Beenox Crates are hiding on the ground right behind walls or objects, smashing the crates is typically not very difficult. The difficult part is finding the crates. And that’s what this guide is for. This guide will teach you how to unlock the iron checkpoint crate by showing where each of the crates are, as well as provide a short description on how to reach them. Also, contrary to what one might assume, you do not have to win the race after smashing each crate for the crate to count, in fact you don’t even have to finish the race. Once the crate is destroyed, you can immediately exit the track.
Crash Cove
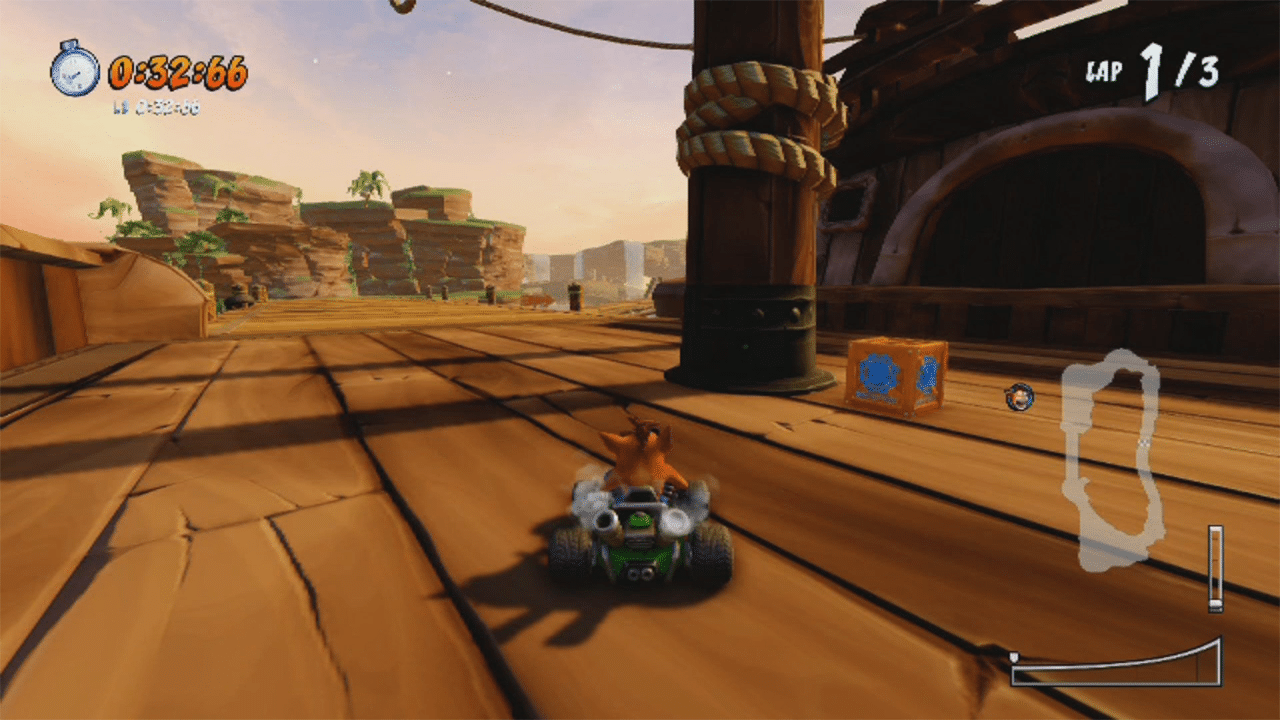
The Crash Cove crate.
After the first curve you’ll find a large puddle of water in the road, and just beyond that there is a ledge to the left, a pirate ship on the right, and a bridge that connects the two of them. You can use the edge of the puddle of water like a ramp to reach the ledge on the left, and from there you can drive across the bridge to reach the pirate ship. You’ll find the crate on the ship hiding behind the mast.
Mystery Caves

The Mystery Caves crate.
Early on this track, just after the first set of turtles, you’ll go around a wide 180-degree curve. The Beenox Crate is hiding among the stalagmites at the end of this curve.
Sewer Speedway

Entrance to the Sewer Speedway shortcut.
This crate is hidden on a secret path that you can access partway through the track. When you first enter the room where the main road takes the form of a half-pipe, drive up onto the left side of the track and look along the wall on the opposite side of the road to find an opening.
Use the half-pipe design of this road to launch yourself into that opening to access the secret upper road of this room. Drive across the bridge and around the corner, the Beenox Crate is hiding on the right side of the road at the end of this secret path.
Roo’s Tubes

The Roo’s Tubes Crate.
Follow the track until you exit from the first tube into a large room. Turn around and you’ll find the Beenox Crate just to the right of the tube that you just exited.
Slide Coliseum

The Slide Coliseum crate.
You’ll find this crate after the third turn of the track. Stop and look to your left. You’ll find the crate on a raised part of the ground near the barriers.
Turbo Track
The Turbo Track crate
From the starting line, turn around and drive the track backwards. Go around the U-turn that would normally lead to the end of the track, then continue to drive until the road curves to the left. Around this point, you’ll find the crate near the wall to your right.
Coco Park

The Coco Park crate.
From the starting line, turn left. You’ll see a small drop into a pool of water. The Beenox Crate is hiding in the water under the ledge. You’ll have to line yourself up with the crate then drive off the cliff to get this box.
Tiger Temple

The Tiger Temple crate.
When you reach the first tunnel, stop and turn around. You’ll find this Beenox Crate off the road to your right.
Papu’s Pyramid
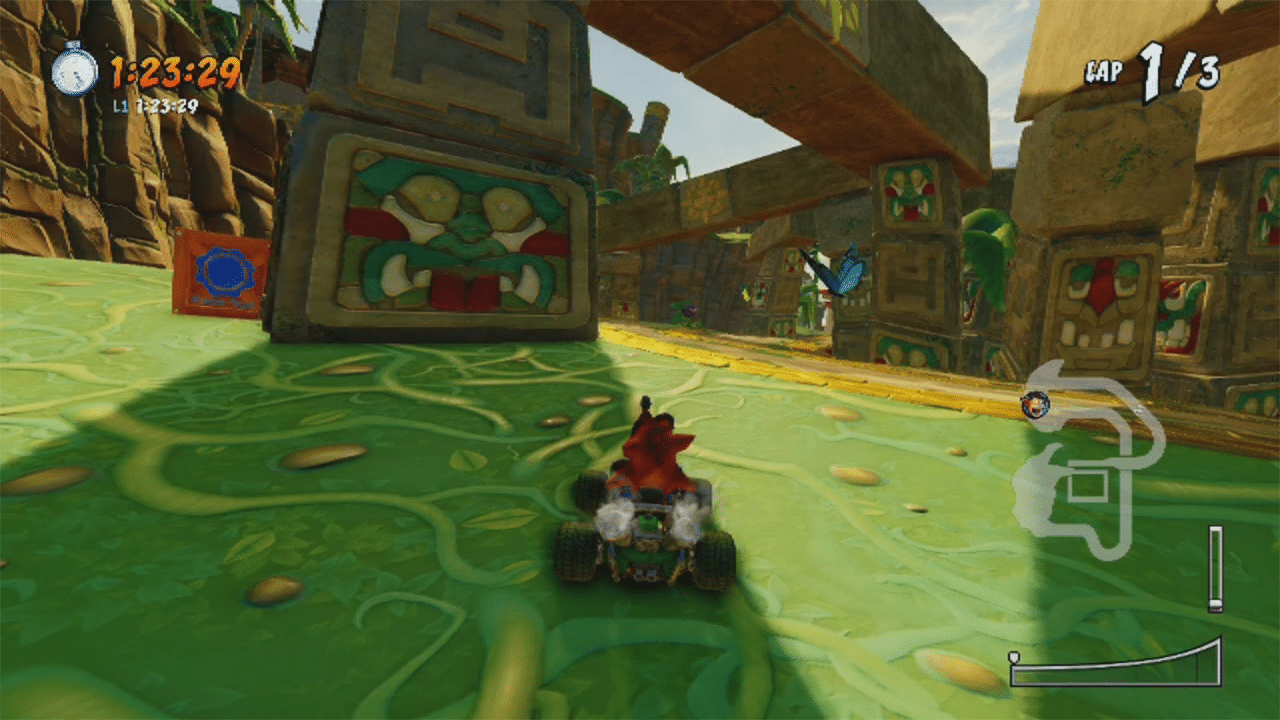
The Papu’s Pyramid crate.
Turn around at the beginning of this track and drive until you reach the hairpin turn that goes under the five stone structures. The Beenox Crate is hiding behind the outer pillar of the third structure.
Dingo Canyon

The waterfall that hides the Dingo Canyon crate.
Near the end of this course, there’s a big jump that leads you back to the beginning of the track. The Beenox Crate is suspended within the waterfall to the left of this jump. It’s hard to see where the crate is exactly, which can make it hard to line up your jump. Don’t be discouraged if this crate takes a few tries, this is probably the most difficult Beenox Crate to smash.
Polar Pass

The Polar Pass crate.
Just before you reach the big jump at the end of this track, you’ll cross three patches of ice in the road. Turn around right before you drive onto the third ice patch and you’ll find that the Beenox Crate was hiding behind a large pillar on your right.
Tiny Arena

The Tiny Arena crate.
Approximately halfway through the track you’ll drive through three hairpin turns in a row. These are followed by two small bumps in the road. Immediately after the second bump you’ll find the Beenox Crate half-submerged in mud on the left side of the road.
Dragon Mines

The Dragon Mines crate.
Not long after starting this track you’ll find a room full of treasure. Surrounding the large pile of gold are two waterfalls, one near the entrance to this room and one near the exit. The Beenox Crate is under the waterfall that is closer to the entrance.
Blizzard Bluff

The Blizzard Bluff Beenox box is by the barrier.
About halfway through this track, a sizable portion of the road is replaced by a sheet of ice. If you turn around while on this ice, you’ll find the Beenox Crate on your left.
Hot Air Skyway

The Hot Air Skyway crate.
Near the end of the track there is a hairpin turn that leads into the home stretch. After passing through this hairpin turn, you’ll find the Beenox Crate hiding under the left side of the road. If you don’t feel like driving all the way through the track, you can save some time by turning around and driving backwards from the starting line.
Cortex Castle

The Cortex Castle crate.
Near the end of the track, you will drop down a series of ledges surrounding the exterior of one of the castle’s towers. The Beenox Crate is hidden here, just after the second drop.
N. Gin Labs

The N. Gin Labs crate
Before using the third turbo pad ramp of the track, look out of bounds to the left. You’ll find the Beenox Crate suspended in the air under an archway. You can reach this crate simply by driving toward it and jumping when you reach the ledge of the track.
Oxide Station

The Oxide Station crate.
On this track, after the first turbo pad jump, you drive through a short tunnel and then you drop down to the next section of the track. After you drop down at this point, stop and turn around. The Beenox Crate will be waiting against the wall.
Inferno Island

The Inferno Island crate.
As you approach the southernmost part of this track, look for a ramp on the right side of the road. Pass the ramp, then turn around. The Beenox Crate will be in the water to your left.
Jungle Boogie

The Jungle Boogie crate.
At the start of this track, turn around. Stop right before you reach the wooden road. You’ll find that the Beenox Crate is waiting just to your right.
Clockwork Wumpa

The Clockwork Wumpa crate.
Towards the end of this track, you will drive through a room with a large clock on the wall. On one of the straightaways of this room there will be a ramp on the right side of the road. Pass the ramp then turn around. You’ll find that the Beenox Crate is hiding up against the ramp on what is now the far-left side of the road.
Android Alley

The breakable window in Android Alley.
At one point in this track you must take three 90-degree right turns in a row. Immediately after these three turns you will see a large window directly in front of you. If you drive through the window, you’ll enter a small building that acts as a shortcut. The Beenox Crate is hiding on the right side of this building near the exit window.
Electron Avenue
The Electron Avenue crate.
Shortly after going through the tunnel with the ! Crate and the two turbo pad strips, you’ll find a blue bridge with a turbo pad ramp on both the left and right sides. The Beenox Crate is hiding behind the ramp to the right.
Deep Sea Driving

The Deep-Sea Driving crate.
Shortly after beginning this track, you’ll enter a large room with a hole in the middle of the road. You can’t miss it, it’s the one with the giant tentacles. The Beenox Crate is hiding in this hole on the side closest to where you initially entered the room.
Thunder Struck

The Thunder Struck crate.
Shortly after the beginning of this track, the road curves to the left, then to the right, then there are a few drops in the road. If you stop after the first drop and turn around, you’ll find the Beenox Crate up against the wall.
Tiny Temple

The Tiny Temple crate.
At the start of the race, turn around and drive to the edge of the road. You’ll find the Beenox Crate hidden in the ledge.
Meteor Gorge

The Meteor Gorge crate.
Near the end of the track there is a wide U-turn that leads to a jump that will bring you back to the beginning of the track. The Beenox Crate is located at the beginning of the wide U-turn, it is behind the orange support beam on the right side of the track, (or on the left side if you’ve turned around like in the above image).
Barin Ruins
The Barin Ruins crate.
At the beginning of this track, turn around. You’ll see that the main road goes off to your right and there is a second path on the left with a turbo pad at what would normally be the exit. If you drive up this second path you’ll find a wall at the end, and more importantly, the Beenox Crate.
Out of Time

The Out of Time crate.
About halfway through the track you’ll drive through a hairpin turn inside of a clock tower. After leaving the clock tower, you cross two small jumps and then drive through a U-turn. Stop halfway through this U-turn and you should see the Beenox Crate off the road to the right behind a large spinning… thing.
Assembly Lane

The arch that hides the Assembly Lane crate.
Drive through this track until you reach the area with the conveyor belt. When you cross over the threshold onto the metal floor, stop and look to your right. You’ll see a large, metal arch. From your current perspective, the Beenox Crate is hidden behind the left side of this arch.
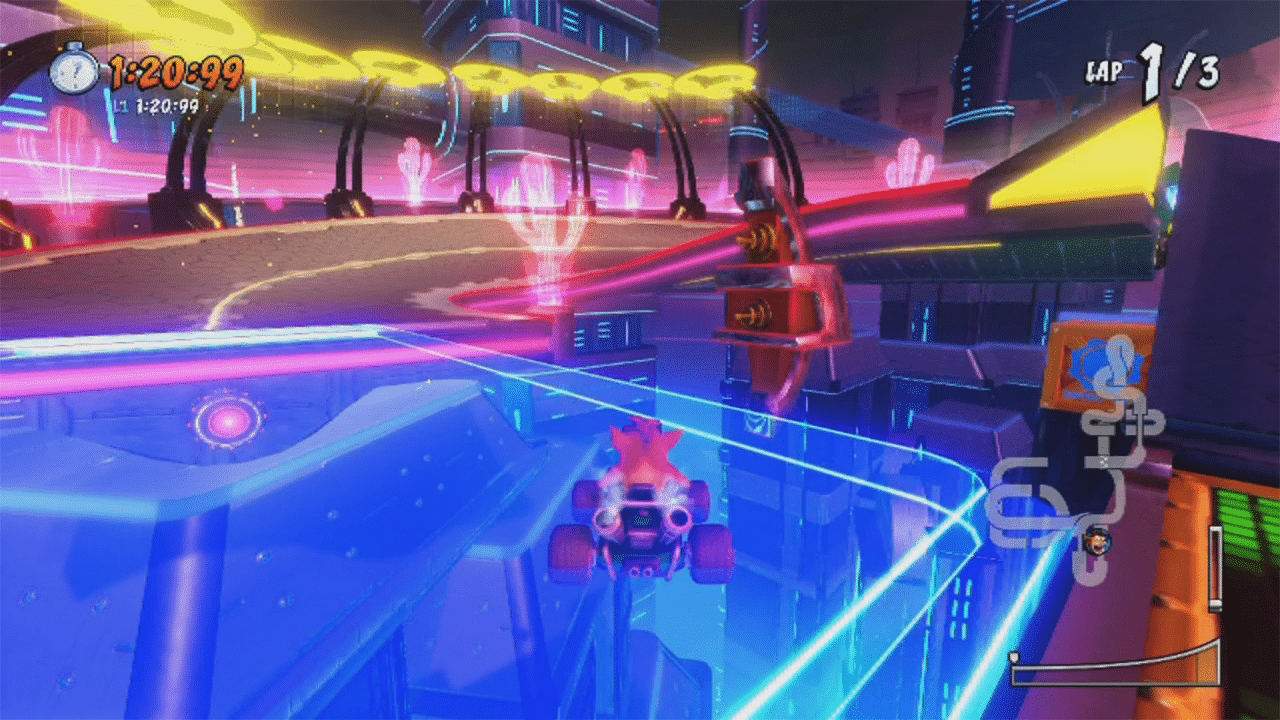
Hyper Spaceway

The Hyper Spaceway crate.
Shortly after driving through the first wormhole, you’ll reach a thin path with buildings on either side of the road. When you reach this walled in section, turn around and you’ll find the Beenox Crate tucked away in a corner on the left side of the road.
Twilight Tour
The Twilight Tour crate.
This Beenox Crate is located in the market near the end of the track. It’s hidden behind the stand right before the tunnel that leads to the end of the track. If you drive the course backwards you should find the crate more quickly and easily, it’ll be right in the middle of the road.
Prehistoric Playground

The Prehistoric Playground crate.
A large portion of the second-half of this track takes place inside of a cave. In this cave there’s a shortcut in the room with the dinosaur nest, you can cut a corner by driving up three large dinosaur bones. But if you drive down this bony path, you’ll find the Beenox Crate is hidden inside the second bone platform.
Spyro Circuit

The Spyro Circuit crate.
This track is split up into three sections which are connected via portals. After traveling through the third portal, stop and turn around and you’ll find the Beenox Crate against the wall near where the third portal dropped you off.
Nina’s Nightmare
The path to the crate in Nina’s Nightmare.
From the starting line, the track will soon curve slightly to the right, then it curves to the left. Instead of following the road to the left, turn right and you’ll find a hidden path that runs parallel to the starting line. Drive up this road and you’ll find the Beenox Crate waiting at the end.
Koala Carnival

The Koala Carnival crate.
Drive along this track like normal until you reach the three large ramps with the red, green, and blue rings. Instead of driving up the ramps, turn around. The Beenox Crate is against the wall in front of you to the right.
Gingerbread Joyride

The ramp to the Gingerbread Joyride crate.
Shortly into this track, you’ll find a downward slope with a turbo pad that gives your kart a blue flame. Stop when you’ve passed this pad. In front of you there should be a series of downward-leading steps with a ramp to your right. Drive up the ramp. The Beenox Crate is located just under the ledge at the end of this raised pathway. There is a turbo pad at the end of this road, which can make grabbing this particular crate a little tricky.
If you’re having trouble getting this crate, there’s an easy way to cross the turbo pad without triggering the boost. Stop just before the turbo pad and keep your brake button held down. Now turn around, line yourself up with the seam that goes down the middle of the turbo pad, and start hopping repeatedly. During every hop, while you are still in the air, you can flick your control stick backward. If you do this correctly, you’ll land a few inches behind where you started your hop allowing you to move across the turbo pad without boosting away. You can continue doing this reverse hop maneuver to safely inch your way across the turbo pad, and eventually you will fall onto the Beenox Crate.
Megamix Mania

The Megamix Mania crate.
At the start of this track, turn around and drive until you go around the first turn (which would normally be the last turn) of the track, then drive passed all the paint mines. You’ll find the Beenox Crate on the right side of the road under an overpass.
Drive-Thru Danger

The Drive-Thru Danger crate.
After you pass the Toxic Burger, there’s a big drop in the road. Off the road to the right you’ll see a green cloud. Just passed this cloud is the Beenox Crate, suspended in the air.
In order to grab this crate, you’re going to want to build up some speed by jumping down the big drop or using the turbo pads, then take a sharp turn and jump off the side of the road into the crate. This is another of the few crates where the challenge actually comes from smashing the crate as opposed to finding the crate.
And there you have it. If you followed this guide, then you should have no problem finding and smashing all 39 Beenox Crates hidden throughout Crash Team Racing Nitro-Fueled. And more importantly, you should now have unlocked and be able to play as the Iron Checkpoint Crate.


